Wednesday, May 31, 2017

Guest Room

My next mini project is to clean up the guest room and decorate a little more purposefully. When we moved in a year and a half ago I put things up because they had to go somewhere and that was fine for the time being. Now that life has fallen a little more into a pattern, and I have a bit more free time, I have decided to clear out the junkie stuff in the guest room and to make it a bit prettier.

I have ordered a couple of new items that will help move this goal along in a big way.

A frame I plan to fill with our wifi info and our even our address...you never know when someone might need those things. BUY HERE

Antique book safes. Part decor, part function. This is a way people can tuck away things to make sure they don't lose it, and it's not sitting out on the desk or nightstands. BUY HERE

Behind the door hooks. Jackets, bags, etc...this is helpful for any guest. BUY HERE

I just think these are cute, and they will help fill up the dead space on the shelf. BUY HERE

I wanted a sign that implied "guest room" but wasn't silly or unfitting for those of us who use the room as a study most of the time. This fit the bill. Works for guests, friends, and permanent residents alike. BUY HERE

Total of guest room updates: $75.98

I do not plan on spending more than this. Any other changes will be made with items I already own. This will be the true challenge!

Pictures of the room to follow shortly.


M.LEWIS

Monday, May 29, 2017

Inspiration Monday

Inspiration Monday! @partridge_farms gets it this week. This simple DIY basket makes me wonder why I haven't already done this. ;-)


M.LEWIS

Sunday, May 28, 2017

The Look for Less

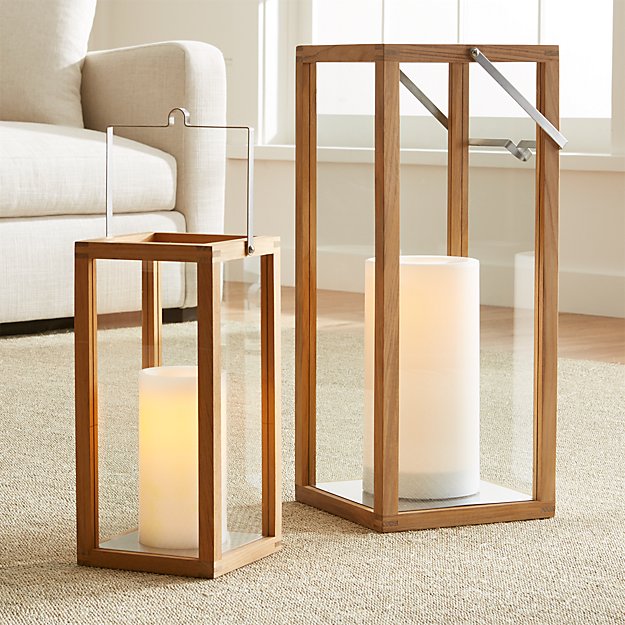
I am enjoying the trend of wood accents. Rustic, reclaimed, and natural. Adding a touch of texture and character to a clean, light space adds depth and interest. You don't always have to spend a lot to get those character pieces. You know I love the "Pottery Barn look" but for "Ikea prices." If you are a parent, you are always on a budget...always. Here is a great example on how you can shop around and save some bucks.


Here are a beautiful pair of wood hurricane lanterns from Crate & Barrel. Small sells for $69.95 and the large for $99.95.

If you love the look but can't afford those numbers, here is a great alternative from Target


Very similar (and more kid-friendly...no glass!) for a budget-respectable price of $17.99 for the small and $22.49 for the large.

If you bought one of each, that's a savings of almost $130 (before tax).

Which is why I have the Target lanterns. ;-)


M.LEWIS

Thursday, May 25, 2017

Americana Decor


With Memorial Day coming up, I decided to break out my "America decor." What was once reserved for Independence Day, now comes out late May and sticks around until mid July...it's now "Summer decor." I don't do beach stuff, so this alternative is more my style. How can you have red white and blue everywhere and not feel overwhelmed? The trick is not to heavily saturate any one area. I use a lot of my spring decor actually, and I pull some stuff out, and insert my stars and stripes. Put away any color, because much can clash with red. I use a deep red and a navy blue, with cream. Bright Americana is too much for my simple style.

Our front door, with our magnolia leaf wreath. I just stuck in a couple flags. The look is simple, but I love the contrast.


Again, I took my spring table and rearranged it a bit, and stuck in my painted mason jars and placed a couple flags.


Added red, white, and blue pip berries to my flowers, and placed the metal flag in the greenery.


Swapped out the pinkish tulips for cream, and added another flag.


Kitchen table, just added patriotic pinwheels.


Kitchen corner. Cream tulips and more pinwheels.


My next step is the back patio, but that will have to wait for another day. Happy Memorial Day weekend!!!

M.LEWIS


Monday, May 22, 2017

Inspiration Monday

It's Monday again! Time to get inspired by something pretty.

@cottonstem is my inspiration, again. She is lovely.


Blue, white, and hydrangeas. My favorite.


M.LEWIS

Sunday, May 21, 2017

The Indoor Window Box Project

I have a large (muntinless) window in my stairwell. Very big, very open. I knew during building that I did not want blinds installed like I did on almost all the other windows. I wanted something more unusual, more rustic, a piece of character. I built wood shutters to be placed in. I loved them...however, there was still a sense of emptiness. Something was missing. I have been thinking about what to place around the shutters to help complete the look. A wreath? No. I have 3 indoor wreaths, 4 seemed too much. Wall hanging on either side of the shutter doors? No...too much. Then it hit me. I wanted an indoor window box. Something small, slender, and light-weight. Something I can stick in simple foliage that won't impede the functionality of the shutters. So, I quickly figured out this would be something I would have to make. Goody, a project.

Very easy. I needed balsa wood. Something inexpensive, very light, easy to place in the window, and thin enough there will still be room to place plants. 31"L x 2.5"W x 3"D. $4 a piece of wood. I already had stain and paint. I did buy plants and floral arrangement styrofoam specifically for this project. I needed some plants specifically narrow and wide. Fill it up without spilling over. Wood and plants both purchased at Hobby Lobby.

All said and done, my indoor window box is complete! Please be forgiving with the odd pictures. This window is so bright, it was very difficult to get a good shot without washing everything out.


Super easy and affordable. Coming down the stairs the next house gives my window an "exposed brick" view and coming up the stairs you get nothing but blue sky and clouds. Not bad either way. My stairwell is happy.


*Have you followed Design on the Side on instagram? Nothing but pictures of my little decor collections and inspirations! @designontheside


M.LEWIS

Monday, May 15, 2017

Inspiration Monday

Inspiration Monday again! This week, @countrylivingmag caught my eye.


Wood beams, stacked stone, comfortable chairs...love this space.

Saturday, May 13, 2017

Master Bathroom Mini Project

Master bathroom complete!

Before     and    After

Before     and    After

Before     and    After

Close up on cabinets

My inspiration

Ok, not too much to explain here. Wood frame is from pre-stained lumber, $9 for an 8ft run...I used 3. Cabinet paint is a mixture of 4 chalk paints. All "Americana." Vintage, patio, gray smoke, and relic. ~$7 per 8oz. Finished off with a polycrylic sealant. Hardware matches my kitchen. Simple brushed nickel knob and clean cuff pull all from Lowe's. ~$20 for all pieces. There were other charges, brackets, screws, etc...but still, overall, very affordable. What this project lacked in cost, it was made up in time, effort, and patience. Kids, man. They do factor into projects. ;-P

Love it!


M.LEWIS

Tuesday, May 9, 2017

Master Bed Wall Art

I was never one for just generic pictures and paintings on walls. I like something interesting, engaging, and different. I put this desire into fruition in my bedroom. Above our bed is one of my favorite DIY pieces, and certainly one of the largest.


M.LEWIS

@designontheside

Want a parade of pretty, rustic, homey images to add simplicity and joy to your instagram feed? I gotcha covered. ;-)


Monday, May 8, 2017

Inspiration Monday

Not every I.M. will be from @cottonstem, but for a second week in a row, she gets it. ;-)


White chairs, wood table, white tulips...she speaks my language.


M.LEWIS

Monday, May 1, 2017

Inspiration Monday

Quick post for "Inspiration Monday!" (Yes, I'm making this a thing.) Who doesn't need a little inspiration and motivation to help kick off the week?

Check out this beautiful Gothic style cabinet! I saw this scrolling through instagram and I LOVE it. So jealous. Follow cottonstem for a great feed of pretty pictures and amazing farmhouse style.


Happy Monday!


M.LEWIS